In this article we will learn how to design a loader which will look something like the following:
We'll be using Blend for Visual Studio 2015 to build this animation.
1) Create a New Blank App(Universal Windows) Project and name it "Loader" or whatever you want.
Before we actually start building the animation, I want you to go ahead and select a desktop screen from the top-left corner of the designer view,because we will be working and testing this animation on a desktop.
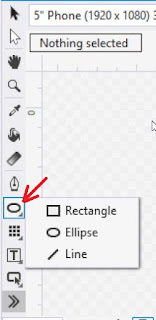
2) Now, we're all set. From the toolbar on the left side of the designer view, click and hold the rectangle icon and select ellipse form the pop-up.

Draw a circle by holding down the shift key and color it black from the properties window.
3) Now draw another circle, color it white and place it on the top of our black circle like below:
We want our inner circle to rotate around the center of our outer circle. This is really simple to achieve. As we know all shapes rotate around their center dot, and by moving that dot we can shift their center of rotation.
4) Select the black circle, hold down Ctrl key and select the white circle. Now move the center dot of white circle exactly on top of the center dot of black circle.
And we are done mingling with the ellipses for now.
5) Go to the Objects and Timeline (View -> Objects and Timeline) window, click on "+" sign to create a storyboard as shown below.
After creating a storyboard, you'll notice quite a bit of change in the interface.
6) Click on the record keyframe button and drag the playhead (the yellow line) to the point in time where the animation should finish, in our case 1 sec.
We'll be using Blend for Visual Studio 2015 to build this animation.
1) Create a New Blank App(Universal Windows) Project and name it "Loader" or whatever you want.
Before we actually start building the animation, I want you to go ahead and select a desktop screen from the top-left corner of the designer view,because we will be working and testing this animation on a desktop.
2) Now, we're all set. From the toolbar on the left side of the designer view, click and hold the rectangle icon and select ellipse form the pop-up.

Draw a circle by holding down the shift key and color it black from the properties window.
3) Now draw another circle, color it white and place it on the top of our black circle like below:
We want our inner circle to rotate around the center of our outer circle. This is really simple to achieve. As we know all shapes rotate around their center dot, and by moving that dot we can shift their center of rotation.
4) Select the black circle, hold down Ctrl key and select the white circle. Now move the center dot of white circle exactly on top of the center dot of black circle.
And we are done mingling with the ellipses for now.
5) Go to the Objects and Timeline (View -> Objects and Timeline) window, click on "+" sign to create a storyboard as shown below.
After creating a storyboard, you'll notice quite a bit of change in the interface.
- Indicates the name of the open storyboard, if you have created a bunch of storyboards, you can switch between them from the drop down.
- The plus sign next to a diamond shape allows you to record a keyframe. In blend, keyframes are marker on timeline which indicates when a property change will occur.
6) Click on the record keyframe button and drag the playhead (the yellow line) to the point in time where the animation should finish, in our case 1 sec.
7) After that, select your inner white circle and rotate it as shown below.
To check what we have recorded so far, go to the objects and timeline window and click on the green play button, above the playhead position timer.
8) Now go to Assets -> Behaviors and click on the "Install 'Behaviours' NuGet Package.
9) After the installation, drag and drop the 'ControlStoryBoardAction' from behaviors window, on the Page in objects and timeline window.
11) Finally select ControlStoryBoardAction and from properties window assign it's storyboard property the name of your storyboard.
And now we are done, just hit the run button and enjoy looking at the animation that you have just created.


No comments:
Post a Comment