Saturday, 13 February 2016

Tackling the Dependency Property Ghost

Dependency property is a term that left me baffled for a long time. But I finally understand them and in this article I'll try to explain what they actually are.

CLR Properties:

Before talking about dependency properties, let's talk about CLR properties for a while. Look at the code below.


 public class A
        {
            private int _var;
            public int Var
            {
                get { return _var; }
                set { _var = value; }
            }
        }

Var is a CLR property whose value can be get/set and _var is the private variable that is used to the store the Var property value in between the uses. The process of storing a property value in a private variable is called backing.

The whole point of using a property rather than simply exposing a public variable is to validate and transform its value using getters and setters.

Dependency Properties:

The dependency properties are basically an upgrade to the CLR properties. In case of CLR, a property is stored in a private variable and accessed using get/set methods, so the next logical step would be to create object based properties.

You could create a class and name it ObjectProperties and give it necessary methods along with getters/setters to make it work as a property. What's the advantage in it, you ask?

Because of being an object based property, we could provide facilities such as reacting to events on other objects and being able to generate events when a property changes. Making object-based properties is a good but complex idea and implementing it would require quite a bit of work.

Well, the good news is we don't have to do the work because that's what dependency properties are. Dependency properties are object-based properties that offers lots of additional features and behaviors as compared to the basic CLR properties.

The most commonly used feature of dependency properties is data binding. It allows you to bind a dependency property to another in such a way, that a change in the value of one, changes the other. It is made possible because of the built-in change notification mechanism of the dependency properties. A callback is registered to notify whenever there is a change in the value of property. 

So, now that we understand what dependency properties are and how they work let's try to declare one. You can do that by typing propdp and pressing the Tab key twice in visual studio.

 public int MyProperty
        {
            get { return (int)GetValue(MyPropertyProperty); }
            set { SetValue(MyPropertyProperty, value); }
        }

        // Using a DependencyProperty as the backing store for MyProperty. 
        //This enables animation, styling, binding, etc...
        public static readonly DependencyProperty MyPropertyProperty =
            DependencyProperty.Register("MyProperty", typeof(int), 
                                         typeof(ownerclass), 
                                         new PropertyMetadata(0));

The first thing you will notice is that even a dependency property has a wrapper. And second is the use of static keyword. Now, the trick is, that the declaration of the dependency property is static and not it's value. A dependency property is declared through a static method which returns us a key(an identifier) of type DependencyProperty that we will be able to pass to GetValue and SetValue to get and set the property on a specific DependencyObject.

The declaration is made static because the same identifier will be shared by all the instances of the DependencyObject, however when you set the value of a DependencyProperty by calling the SetValue on a DependencyObject instance, then each instance of the DependencyObject on which the SetValue is called will store its local value of the property. The value of a dependency property is not stored in a field of your object but in a dictionary of keys and values provided by the base class DependencyObject. The key is the identifier and the value is the value you want to set. Also the value of a DependencyProperty is resolved dynamically when calling the GetValue(). It checks if a local value is available, if yes it reads it directly from the dictionary, if not it looks for an inherited value and if that is also not available, it uses the default value defined in the property metadata.

Another advantage of  dependency properties is that storage is only needed for properties whose value is assigned.  It almost never happens that we assign all the properties of a particular control, a lot of properties are just left at their default values. In case of dependency properties the default values are stored as meta-data related to the property and do not require any memory per control instance if the property remains unassigned.

I hope that above article made sense to you and after reading it you finally understand dependency properties.

Thursday, 11 February 2016

Create a Customized Loader using Blend for Visual Studio 2015


In this article we will learn how to design a loader which will look something like the following:


We'll be using Blend for Visual Studio 2015 to build this animation.

1) Create a New Blank App(Universal Windows) Project and name it "Loader" or whatever you want.

Before we actually start building the animation, I want you to go ahead and select a desktop screen from the top-left corner of the designer view,because we will be working and testing this animation on a desktop.


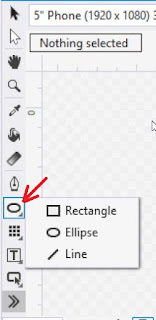
2) Now, we're all set. From the toolbar on the left side of the designer view, click and hold the rectangle icon and select ellipse form the pop-up.
    
                                             
Draw a circle by holding down the shift key and color it black from the properties window.


3) Now draw another circle, color it white and place it on the top of our black circle like below:


We want our inner circle to rotate around the center of our outer circle. This is really simple to achieve. As we know all shapes rotate around their center dot, and by moving that dot we can shift their center of rotation.

4) Select the black circle, hold down Ctrl key and select the white circle. Now move the center dot of white circle exactly on top of the center dot of black circle.


And we are done mingling with the ellipses for now.

5) Go to the Objects and Timeline (View -> Objects and Timeline) window, click on "+" sign to create a storyboard as shown below.


After creating a storyboard, you'll notice quite a bit of change in the interface.


  1.  Indicates the name of the open storyboard, if you have created a bunch of storyboards, you can switch between them from the drop down.

  2. The plus sign next to a diamond shape allows you to record a keyframe. In blend, keyframes are marker on timeline which indicates when a property change will occur.

6) Click on the record keyframe button and drag the playhead (the yellow line) to the point in time where the animation should finish, in our case 1 sec.


7) After that, select your inner white circle and rotate it as shown below.


To check what we have recorded so far, go to the objects and timeline window and click on the green play button, above the playhead position timer.

8) Now go to Assets -> Behaviors and click on the "Install 'Behaviours' NuGet Package.


9) After the installation, drag and drop the 'ControlStoryBoardAction' from behaviors window, on the Page in objects and timeline window.


10) Click on the name of your storyboard, from the top left corner of the Objects and timeline window and from the properties window set the repeat behavior to forever.

11) Finally select ControlStoryBoardAction and from properties window assign it's storyboard property the name of your storyboard.


And now we are done, just hit the run button and enjoy looking at the animation that you have just created.

In the gif above, the motion does not appear to be smooth but believe me it will be when you run the animation on your local machine.

Sunday, 7 February 2016

Sealed Methods and Classes in C#

Sealed Classes:

In simplest terms, you can't inherit form a sealed class. The sealed keyword literally seals it for further inheritance.

Why would you want a Sealed Class?

Classes should either be designed for inheritance or they should entirely prohibit it. If a class can be derived from, you have to think of more possibilities, methods like Equals become more complicated and consequently documentation gets bulky.

Now, if there is a class in your design that you are sure will never be a base class, you should go ahead and seal it. Not only it would make your program simple but it would also prevent any bugs that might arise due to ambiguity.

Secondly, it offers better performance. Because a sealed class will never be a base class, run time optimization can make calling sealed class methods slightly faster.

Note: A static class can neither be inherited nor instantiated. However, in the case of a sealed class you can create as many instances as you like, you just can't inherit from it.

Look at the code below:

Our class A is sealed and we have successfully created it's two instances, the first one in class B and the second one in Main function.


 class Program
    {
        static void Main(string[] args)
        {
            B b = new B();
            b.print_B();
            
            A a = new A();
            a.printA();

            Console.ReadLine();
        }
    }

    sealed class A
    {
        private int x = 1;
        public void printA()
        {
            Console.WriteLine(x);
        }
    }

    class B
    { 
        public void print_B()
        {
            A a = new A();
            a.printA();
        }
    }

Now let's see what will happen if we will try to inherit class B from class A.


We'll get a compilation error stating that derivation from a sealed class is not possible.

Remember: Other classes can't inherit form sealed class whereas a sealed class can inherit from any other class. 
 
Are sealed methods possible?

Well yes, just like a class you can also seal a method with the use of sealed keyword, but you must also use the keyword "override".

Why? Because the intention behind sealing a method is to stop further overriding of it.

In other words, at any level of inheritance, if you want to restrict the next level of derived classes from overriding a virtual method, then create that method by using the keyword sealed along with the keyword override.

Look at the code below:

 1
 2
 3
 4
 5
 6
 7
 8
 9
10
11
12
13
14
15
16
17
18
19
20
21
22
23
24
25
26
namespace ConsoleApplication2
{
    class A
    {
        virtual public void  printA()
        {
            Console.WriteLine("In class A");
        }
    }

    class B : A
    {
        sealed override public void printA()
        {
            Console.WriteLine("In class B");
        }
    }

    class C : B
    {
        override public void printA() //Error: cannot override inherited member
        {                             //B.printA() because it is sealed. 

        }
    }
}


The line 21 will throw an error, since it is trying to override a sealed virtual method.

I hope the above article made sense to you and now the idea and functionality of sealed classes and methods is sealed in your mind.

Friday, 5 February 2016

Visual Studio 2015, Shortcuts, Features and More

In this article we will talk about features, shortcuts and tips for Visual Studio 2015 which will make you more comfortable and a hundred times more productive with the IDE you are working in.

Shortcuts:

1)  To go to a specific Tab or Location 
      Press Ctrl + Tab, and the following pop-up will be displayed and you can specify the tab you       want to go to.


2) To bring the quick actions light bulb in view
    Press Ctrl +  .

3) To Bookmark a line of code
     Press Ctrl + K

4) To increase font size, Press Ctrl + Shift + .
    To decrease font size, Press Ctrl + Shift + ,

5) While intellisense, no doubt is an extremely helpful tool, but sometimes you wish you could peek   at the code behind the intellisense window. Simply, hold down the Ctrl key to see through the code hidden behind it.


After holding down the Ctrl Key.


6) Formatting code:
    To Format your code and to bring it back to order
    Press Ctrl + K then Ctrl + D

7) Define Properties of a private field:

    Write Prop and then press Tab Tab for the following syntax


    And PropFull and then Tab Tab for the following syntax


8)   Peek definition by pressing Alt + F12 and Esc to close

9)   To move a line or set of selected line, use Alt + Up Arrow/Down Arrow

10)  Go to a specific line number  Ctrl + G
 
11)  Have you ever wished to select a piece of code vertically! Wish no more, simply hold down the Alt key and select text vertically.

12)  To Comment code press, Ctrl + K, Ctrl + C
       To Uncomment code press, Ctrl + K, Ctrl + U 

13) For surround-with code snippets, use Ctrl + K, Ctrl + S

IDE Features

 1) Task List : can be used to keep track of comments like TODO, UNDONE, HACK or even        customized tokens.

       To open the task list go to View -> Task List 

 2) Lazy Code Snippets: allows you to drag and drop the selected code to toolbox and place it under one of the sections or create one of your own. Now this piece of code will be available in all of your projects and you won't have to retype it, a simple drag and drop as required will be enough.
So, now you why it's called LAZY.

 3) Quick Launch: is a search tool, but instead of searching through code, it searches through the visual studio itself. 

Let's suppose you want to turn on the line numbers, but you can't find the option. All you have to do is type line numbers in the quick launch bar, which is situated at top right corner of the VS window and it will display all the results it could find after searching menus(@menu), most recently used(@mru), options(@opt), open document(@doc) and NuGet packages(@nuget)


As you can see, the search result returns the location of line number, Options->Text Editor->All Lanuages->General.

4) Preview Tab: allows you to quickly glance at file without actually opening it in a new tab.


     However, if you decide to open the file, you can do that by clicking on the Keep Open icon which is on the left of the cross for closing the file.

Bonus Tips:

 1) Display Number of Lines: Go to Tools > Options > Text Editor > All Languages > Line Numbers
  
2) Offline Help: Go to Help > Set Help Preference > Launch in Help Viewer

3) Feedback: Next to the Quick Launch Bar is a feedback icon, which allows you rate product, send suggestions and report a problem.


Tuesday, 2 February 2016

C# relationship with CLR


Common Type System (CTS):

CTS is basically a standard that specifies how types are declared, used and managed in the common language runtime and it is intended to allow programs written in different programming languages to easily share information. It  establishes a framework that helps enable cross-language integration, enforces type security and define rules which languages must follow to ensure that objects written in different languages can interact with each other.

Now following these guidelines, C# is a very type safe language. It's strongly typed because type rules are very strict e.g you cannot call a function that accepts an integer with a floating point number unless you perform explicit conversion.

Common Language Specification (CLS):

CLS is a subset of CTS, it specifies a set of rules that needs to be satisfied by all language compilers targeting CLR. CLS are mere guidelines and restrictions that a language should follow so that it can communicate with other .Net languages in a smooth manner.

For example: C# does no allow multiple inheritance but c++ does, therefore c++ code cannot be used inside c#, because it is not a CLS compliant language.

Common Language Runtime (CLR):

The .Net framework consists of CLR plus a set of libraries. The two terms BCL(Base Class Library) and FCL(Framework Class Library) you will encounter often being used interchangeably, however there is a slight difference between the two. BCL consists of mscorlib(Microsoft Core Library), system and possibly other additional assemblies. However, it does not contain ASP.NET, ADO.NET and WinForms and other such classes/namespaces that provide additional functionality.

FCL is BCL plus everything that ships as the .Net framework. Therefore, FCL is the entire framework whereas BCL is just the core libraries.

The c# code or any of the .NET languages code gets compiled into CIL(Common Intermediate Language) which is often called managed code. And when finally CLR loads an assembly, it converts the IL into the native code of the machine. This conversion from IL to native code is done by CLR's JIT(Just In Time) compiler.

JIT compiler:

JIT compiler converts the appropriate instruction to native code for execution just before the function is called and hence the managed code or IL is compiled only when it is needed. CLR provides various JIT compiler and each works on a different architecture depending on OS. This is the reason why Microsoft Intermediate Language can be executed on different OS without the need of rewriting the code specific to that OS.

C# relationship with CLR

Technically C# is independent of CLR, however it depends on a runtime equipped with a host of features such as:
  1. Automatic memory management
  2. Exception Handling
and etc. CLR offers automatic memory management, it has a garbage collector that executes as part of our program, reclaiming memory of objects that are no longer needed. C# type system maps closely to the CLR type system because both share the same definitions for predefined types.

So, it is evident that the Design of C# maps closely with the design of Microsoft's CLR which provides the above mentioned runtime features. 

Above was a brief overview of all the terms you'll hear while listening to a .NET or even c# discussion. Hopefully now you'll know the meaning behind them.